
savvy graphical Signal Flow Diagram option features
- an editable graphical signal flow diagram of any drive.web device configuration.
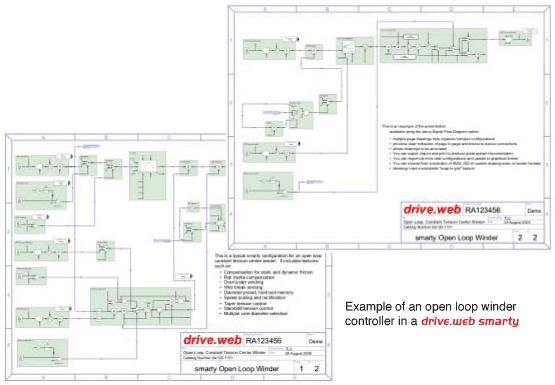
- multiple page drawing organization for complex configurations of drives or complete systems
- clear indication of page to page and unit to unit connections
- the ability to annotate drawings
- export, import and print graphical configurations and produce great system documentation
- import old drive.web configurations and update to graphical presentation
- choose from a selection of ANSI or ISO drawing size and border formats
- a selectable "snap to grid" drawing feature
savvy-SFD demo mode
To turn on the savvy-SFD graphical Signal Flow Diagram demo mode open the "File" menu, select "Demo Mode" and check "savvy-SFD". This will allow you to run the savvy-SFD option with "phantom" devices only. You will be able to create any configuration but you will not be able to save or print the files you create. Afterwards you will need to uncheck the demo mode to revert to the full basic savvy functionality.
You can add this powerful feature to savvy for only US$198. Click here for more information.
First Step ...
Before starting with savvy-SFD please read the "Starting with savvy" notes, accessed from the "Help" menu, and familiarize yourself with the savvy basics.
To check out the savvy-SFD option try this:
- From the "Directory" menu select "Create Phantom Device ..." and select "dw110/dw114 smarty"
- Give the smarty lots of features by selecting:
- "-02 ModbusRTU (isolated RS485)"
- "-03 7 Universal Inputs, 2 Analog Outpus, 3 Digital I/O"
- "-04 ModbusTCP"
- "-05 Library 1 (basic)"
- "-06 Library 2 (winders)"
- "-07 Encoder 1"
- "-08 Encoder 2"
- enter an IP address such as 192.168.1.1
- click the OK button
- Left click on the smarty image to drill down to the "Function Block Engine" level
- From the SFD menu select "Change Border" and select "ANSI A Landscape".
- Hit the "H" (home) key to get the full picture of your drawing.
- Right click anywhere in the blank drawing space to open the Function Block List and select "I/O" > "UIP1 Analog" and you will see analog input terminal D1 appear on your drawing.
- Repeat step 6 and select from "I/O" > "UIP2 Analog", from "Control" > "PID" and from "I/O" > "AOP1".
- Click and drag the function blocks to convenient and logical locations on your drawing (i.e. analog inputs on the left, PID in the middle and the analog output on the right.
- Remember:
- As the cursor passes over any object or connection its key data appears in the top of the window
- Zoom at the cursor point by hitting the "c" key (in) or "x" (out) with "Alt" (fast), "shift" (slow)
- Zoom in and out with a mouse wheel
- Pan by holding the Alt (Option) key and moving the cursor or by hitting the up, down, left, right arrow keys
- Get the optimum "Home" view in your window by hitting the "H" key
- Drill down into function blocks by left clicking on them
- Open a parameter setter by left clicking on the parameter
- Pass your cursor over the output of the UIP1 block and when the little target circle pops up, click and drag a connection to the target pop up circle at the PID setpoint input. Release the click and you should now see a blue connection line - it's as easy as that!
- Similarly connect the output of the UIP2 block to the PID feedback input and connect the PID output to the input of the AOP1 block.
Now, with a few easy mouse actions you have created a full featured PID controller with high quality documentation you can print and save!
Other savvy things to remember:
- To save your entire system configuration go to the "Directory" menu at the top "Device Directory" level, and select "Export Data".
- To save an individual device configuration right click on its icon either at the top "Device Directory" level or at the top of the configuration list at the "Function Block Engine" level, and select "Export Device Data".
- To retrieve your configuration go to the "Directory" menu and select "Import Data and Create phantoms".
- To enter your drawing description information drill down to the Function Block Engine drawing page and from the "SFD" menu select "Set User Attributes".
- Right click on any object to rename it, get information or delete it.
- Right click on any parameter also enables you to add it to a parameter dock or make a connection to a remote location.
- When you drag a function block to a new location in a drawing you will see "autoscroll"
borders and "autopage" corners appear in pink around the page borders.
Note that savvy will automatically reference the page and page location on any connections that are made from page to page. There is a page "go to" in the bottom left corner of the Function Block Engine window.Autoscroll - drag the function block onto a border and the page will automatically scroll.
Autopage - drag the function block into a page corner and the drawing will page as follows:- Top right corner indexes up a page (auto-repeats approximately once a second)
- Top left corner indexes down a page (auto-repeats approximately once a second)
- Bottom right jumps you to the last page
- Bottom left jumps you to the first page
- To display a key parameter value on the Function Block Engine window start to drag a connection from the parameter, press the "control" key and let the mouse button go. A parameter display will appear and you can drag it to wherever you want it in your drawing.
- To show a trend chart for selected parameters right click on each parameter either at the Function Block Engine level or at the Function Block detail level and select "Add to Parameter Dock". With the "Dock" window active select the "Dock" menu > "Show Trend"
... and this is just the basics!
You can use savvy to create, document and operate drive systems of any complexity cost effectively. With its multi-user remote access capability for configuration, monitoring and control it is an unbeatable drive systems design and management tool.
drive.web products
Currently there are two basic drive.web product groups that interface to the savvy tools:
smarty - is a range of DIN rail mounted distributed control processors with a variety of i/o options that can either work as stand alone programmable systems processors or can be integrated into an Ethernet LAN with drives, operator stations, PLCs and SCADA systems.
speedy - is a range of high speed drive.web processor boards that interface directly with a drive microbus. These are available for E-Series AC vector drives and PL-Series Digital DC drives for high performance applications.

drive.web savvy Training Courses
The drive.web technology and the savvy drive system design tools are very sophisticated and we strongly recommend that to get the most out of your systems you attend one of our savvy training courses. For more information, please contact info@driveweb.com or call (USA) 410-604-3400 for details.
To get savvy or a free savvy update ...
Go to www.driveweb.com, click on "get savvy" and choose the version you need for your computer operating system.
To get more savvy information
We hope this is a useful introduction to savvy and the drive.web technology. If you would like someone to go through a more detailed presentation of savvy, need further information or would like to attend a user training course please do not hesitate to call us at 410-604-3400. For more information, please visit: www.driveweb.com